-
Franken pattern jumpsuit, 40s meets 60s

Last year I fell in love with jumpsuits. Big time. This post is about my forth jumpsuit, working from this pattern, a 60s Vogue 6435. My first make was true to the pattern, a wee strapy number in the style of those glamourous 20s-30s beach pajamas.

Since that one wonderful make, I have gone on to some franken-pattern jump suits, I needed some I could wear in the cooler months, so made a couple with a simple self drafted kimono bodice. Which I love, one in wool crepe for winter weather, and one in a synthetic, more between seasons, and practical fabric for easy care. They get out a lot!
I made this beautiful 40s noir frock, with a really nice bodice, pleats at the shoulders, low cut back and well, it’s perfect for another jumpsuit, isn’t it? When I picked up this lovely blue fabric from the op shop, it whispered “I’ll be your dream jumpsuit….”

I don’t need my arm twisted, so I just got on to it. The Vogue 273 is very elegant with it’s sexy low back, but I was after something a little less, ‘cocktail hour’… so I brought the scooped back up to bra level. I also lined the bodice in a lovely cotton silk from a friend de-stashing. I had enough to half line the pants, which works well. The lining stops at above the knee. I used that technique where you don’t hem the lining, but use the fabric cross grain and leave the selvedge edge as the finished edge. It’s perfect in this case as no line that shows where the lining finishes (unless you look hard), and the pants are lined and comfy where I wanted it.

Pins and then stitch basting to get those pleats to behave! I am so happy with how it turned out…

The modified back.

The shoulders are free of shoulder pads, though the pattern calls for them, the thickness of the pleats gives it enough structure, I think.

I think it works well.

Did you see my hat?

Extra wide legs!

I use many different colours with this jumpsuit, I really like the red and blue combination, and especially love getting out my nana’s extra long glass beads.

Onto another jumpsuit soon….
#vintagepledge
-
My Couturier Vogue Project for Vintage Pledge 2016

I chose this project as my Vintage Pledge July Extravaganza guest blogger contribution for Kestrel Makes, part of the sewing duo that brings us all The Vintage Pledge fun. It was a pleasure to be asked to share a project, and I so enjoy sewing all the vintage makes and retro sewing projects that come out for this challenge. I needed a good reason to complete this baby, and I wanted to share something rather special too.
The Vogue Paris Original Designer by Patou.
One of my first forays into Vintage Couturier Patterns, I started this sewing project about a year ago. I sew multiple projects at once, sometimes I get loads sewn up, sometimes projects languish if I hit a road block, I find it helps me stay productive and challenged. I can act on inspiration and when I feel stuck I can get some positive happy sewing times from an easier project. This project brought with it some challenges and it has taken some time to complete, until now!

Pattern details
This is a Vintage Vogue 1195, Paris Original Model by Patou, printed in 1952. It has an asymmetrical button down front, a rolled collar, self fabric belt, eight bound buttonholes, plus two smaller ones on the cuffs, and voluminous two-piece bias cut sleeves. The neckline has a lovely shape with two small darts at the back of the neck, and, hidden by the belt are several small darts in the bodice along the back waist line, that create this lovely shape at the back.

Those sleeves, cut on the bias, used a lot of fabric…

…and have this great shape with a little pleat at the slightly dropped shoulder.

Bound button holes on the cuffs, and my vintage gold gloves! Here’s how they turned out.

Fabric and notions
The fabric is a lovely wool and polyester (10%) crepe that I bought new from a fabric store, rather special, on sale some time before… I chose self fabric buttons, spent ages trying to find decent ones around various sewing supply shops in town…

Tried a few different sizes, the ones above, just too big!

I even considered pretty purple vintage buttons from my mums stash, and went for small self fabric buttons.

Sewing it up
I made a toile, which was a smart move as I was able to practice the assembly and get my head around how that lovely front button up works. It was still a bit tricky and all the marking (thread and chalk) nearly did my head in…hence it taking so long.

The instructions were adequate, and this was the first time I have made a collared dress where the facings shape the collar, rather than a shirt collar which is a separate piece, assembled and then inserted.

Attempting the pattern illustration pose!

My main regular adjustment is for a hollow bust, and I took a small amount out for this, and I think it’s not quite right, I also needed to take some out of the bust and play around with the placement of the two under bust buttons and button holes – to try and get them to line up with the lower bust dart. As I had a bit of trouble with this on the toile, I left the bound buttonholes til the end, making a little more tricky.

Final verdict
I do really love this dress, it is still ‘new to wear’ for me, and I’m looking forward to getting it out now the cooler weather is upon us. This really was a steep learning curve, I have the toile pieces, and I would like to make it again, when, I don’t know!
I would recommend the pattern, though perhaps not for a novice, and make sure you give yourself plenty of time to complete it, practice those bound button holes, and, as I reminded myself, several times, “Follow the instructions” !
#vintagepledge #vpjuly
-
Vintage Suit Sew Along jacket shell progress
How is your vintage suit going? I’ve been making a lot of progress over the last week or so, and I’m enjoying seeing just how the jacket especially is taking shape, quite literally!
Did you make a note of our new completion date, we have until the end of July to finish our suits, during June I’ll be sharing the end results. It’s very exciting. There are a few of us who need more time for one reason or another, so it is likely that the Vintage Suit Sewing fun will go on for sometime.

If you caught my previous post, you’ll recall I finished the welt pockets, which was really tricky. So this week was about sewing in the (imitation) hair canvas on the front jacket panels. The instructions advise sewing the interfacing to the seam allowance and trimming off the remaining centimeter. This is not the amount of work I had anticipated, no pad stitching, even.

I could have gone ahead and pad stitched it on anyway, however, given the black and white weave and the challenge of hiding all stitches, I am happy to go along with the original instructions…And finish this baby on time!
I referred to my Readers Digest Complete Book of Sewing for tailoring tips, using it for drafting the hair canvas interfacing for the back of the jacket.

Really good instructions, I used the one piece method, making darts at the shoulders, and contouring along the curve around the mid back.

All sewn in place, it works well, lightweight, and softly structural.

Pressing the shoulder seams, look at the shapely collar!

Here is the shell of the jacket sans sleeves while I consider the bias binding on on the collar.

The instructions for the jacket include adding hem tape, which will be the next step before the sleeves go in.

I’m impressed with the shape of the jacket already…

…But I leave it here to whip up the skirt which will need to hang for a few days (or a week!) before I hem it…

I had this whole project with me when we went away to Nelson and had a long night up with the fire going cutting out the lining pieces for both jacket and skirt, hooray for that extra carry on bag…I’m so glad I had it as time is racing by!

A detail of the skirt, it’s a simple circle skirt, and with the weight of the fabric, I didn’t want to leave it till last minute.

I have really enjoyed my work room today, my kids have been very happy playing together, so I made the most of that precious time and the sunny space. I’m lining the skirt using this cute spotted cotton, the skirt has one pocket and a side zipper, not technically true to the era, I opted for an invisible zipper from my stash as I’m in the make-do stage of the the project (all that fancy canvas is pricy!) I’m also going to need to track down some hem tape – or make some – to give some body to the skirt as per my inspiration…

(Oh can’t forget to make a wee headpiece to match…)

Very straightforward, so it’s just waiting for me to hand stitch the inside of the waist band to the lining and voila! It’ll be out and hanging for as long as I can leave it….Working towards the end of the month for the deadline.
How are your Vintage Suit Sew Along projects going?
#vintagesuitsewalong #vintagepledge
-
The lighthouse and the lichen


We had our first ever family holiday last week, we had a few days in Nelson together, an art project for Mr Carter and a spare home we could occupy, even some wheels to get around in. Luna and Blake had their first plane flights, it was wild! They recalled excitedly, the ‘plane lollies, cups of water and cookies’ they were delighted to receive onboard. Then there were the electric blankets and a fireplace, bliss, as far as they were concerned.

We knew we were in for some chilly weather, what we didn’t anticipate were beautiful clear days, and an adventure to – and up into – a lighthouse. Luna and Blake have been into maritime disasters, lighthouses and shipwrecks for some time, so this was extra special.

We were really taken by the Boulder Bank in Nelson, it’s something of a unique geological feature of the bay, and visited it a couple of times.

It’s a spit made from boulders, quite literally, boulders, boulders, everywhere.

It’s an arid and extreme environment, unusual plants and lichen inhabit this place.

Really fascinating.

Beautiful colours textures.

We all enjoyed learning about the history of human occupation of the Boulder Bank, there was evidence of human buildings and living still on the site.

Old buildings.

Unexpected spring flowers near the lighthouse.

This is an historically significant light house, and while it is not a working lighthouse any more, it is well cared for and well worth the visit if you can negotiate the boulders, which are not for the lose ankles or gamy knees!

Such an interesting building.

So beautiful on the inside!

Great colours.

Steep stairs!

Bleak and bold with the red paint.

That bulb!

Looking up the spit to the beginnings of the boulder bank.

And down towards The Cut.
There were amazing discoveries to be made everywhere, like bird and fish bones.

And so much rubbish! Our small party brought back a couple of bags of really random trash.

I was taken by the lichen covered rocks.

Which were down the inside, harbour side of the bank.

Amazing colours and textures.

Mosses.

And a small collection.

We could easily spend days here, so much to see, collect, wonder about and explore. We have a deeper appreciation of how hard life was for the people who built the lighthouse and other dwellings, living and working here too. I just love it when what we have been reading and learning about comes together in real life experiences.
I also loved the lichen, it’s very relevant to my current projects….but that’s another post.
-
Vintage Pledge fun in July

Have you been following all the instagram fun with the Vintage Pledge Extravaganza this month? I have really enjoyed seeing what other vintage makers have been sharing…like sewing space:

Currently making….My priority is my suit for the Vintage Suit Sew Along.

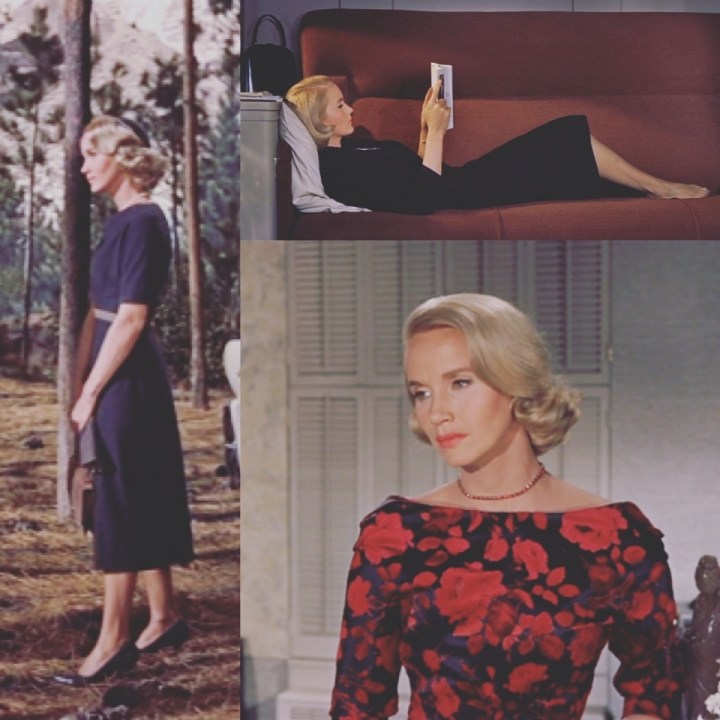
Filmspiration…..I love Eva Marie Saint in North by Northwest.

Decades, 1930s or earlier…my deco style jumpsuit.

Decades, 1940s…my noir dress.

What’s up next? Take a look at the details below….

-
Vintage Suit Sew Along – catch up and a new completion date


How is your suit sewing going along? The facebook group has been fun, I think there’s some heads down getting on with it, perhaps a little bit ‘oh my god this is going to take ages!’ We have also agreed on a deadline, we are working to have our suits sewn up by the end of July. I hope this will give you enough time, I’m certainly feeling the pressure!

I must apologise for the radio silence, and for not posting updates on my suit sewing. We had some major health challenges with my children and I coming down with a rather nasty virus, which included a couple of days and nights in hospital with my youngest, things were not looking good….we are all ok now, and recovered about a week later. Busy times, I lost a few weeks in the blur and sleep deprivation!
So, I’m cracking back into my suit sewing…

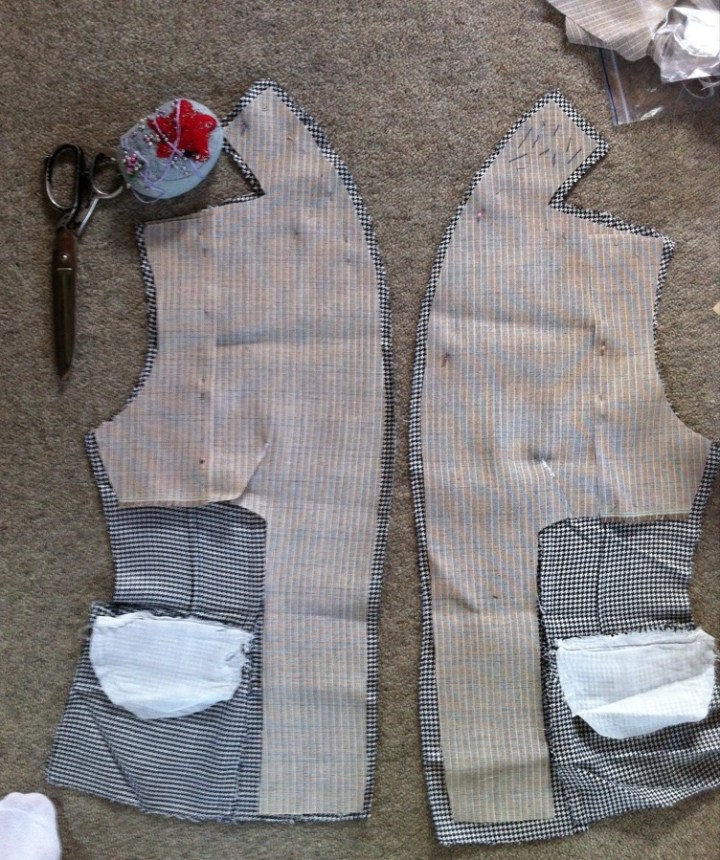
I have had some time at my mums place, so a bit of a different view out over Kawau Bay. The construction of the jacket of my suit goes straight into hard-out welt pockets with flaps, so that’s been keeping me busy and focused on getting them just right.

All fun and games, it’s been really fiddly work, the houndstooth frays like anything, and the pocket flaps are stitched precisely to the seam allowance, so not a lot holding it together either! I have to say though, it all works, especially as I am becoming far more disciplined when it comes to “Following the instructions”. It does pay off.

I needed to finish the edges straight away as they started to fray! Oh dear!

I’m pleased with how they turned out after all the tricky maneuvering and precise sewing… and they work!

I was also quite excited to see how well the flaps hold their shape, they have horse hair canvas interfacing, and they stand out somewhat from the jacket panels, just like the illustration. Cool! That’s what I was after.
So….how are you going with your suit sew along plans? Does the end of this month work for you?

#vintagesuitsewalong #vintagepledge
-
Vintage Vogue 273, the Noir 40s dress


Vintage Vogue 273, quite a special little number, very simple and elegant. I can see how this era influenced the 1980s, can’t you? I fell in love with this pattern, but was a little intimidated by it!

I did a quick toile of this dress, using a sheet…then quickly cut in to this piece of fabric I had been considering for this project for a while. It is curtain fabric, I think, it has a heavy-ish feel, lovely cool to touch, a soft drape and slightly glossy grey sheen. Unusual, but I thought it would work, in the back of my mind was the thought that it just might be a bit too heavy for the drapes and folds to work…

All laid out to cut.

This dress was quick and relatively simple to make, no new techniques to use, just a different bodice shape, and much longer skirt than I have made before. I lined the bodice using a remnant of some lovely soft cotton, which has crayfish on it, cute!

I was really unsure if those glamourous folds around the hips at the front of the dress would be flattering in real life, so I was really happy to see that it works well. I really, really love this dress, I can’t wait to make another one (perhaps a shorter skirt?) or even just another full length version in perhaps a stunning dark red or green? I love it. But then I’d need cocktail parties, at least every week, you know? So perhaps just one….

This is also the lowest backed dress I have made, like lower than bra level, and I was a little concerned about whether I’d need to add any structural support. The pattern instructions didn’t call for any, and the high neck line seems to help it all stay in shape. Did I say how much I love this dress…?

I accessorised with my nana’s vintage fascinator with net, kid gloves, and some pretty vintage earrings also nana’s! Check out the box:

“J. R. MacQueen, Quality Jeweller Blenheim”, earrings and a necklace, which I don’t wear often enough….

Back to the dress! The back skirt panels are extra flared, adding lovely folds to the back, and more lovely draping – I did worry that the fabric would add a lot of extra bulk and weight at the back, but I think it works ok. I made self covered buttons for the back, with loops, I also added a waist stay inside to help hold the weight of the skirt. It still sits somewhat out from my waist at the back, which is probably also exacerbated by my slight sway back.

The inverted ‘V’ front panel and the folds at the front…

So sculptural. It actually was not quite as simple as I may have said…making sure the folds were going the right way did require a couple of attempts at basting in place, checking the fall etc was as it should be. But I’ll put that out of my mind so I’ll dive straight into another make…

Oh and that skirt! The back is so lovely!

I like the simple elegance of the dress, really simple pleats, and the folds in the skirt work really well.

Oh and check out the shoes! I picked them up at the Very Vintage Day Out, NZ$20, 30s or 40s brocade heels…score!

Perfect!
The pattern called for shoulder pads, but I was a child in the 80s and….I’m kind of terrified of shoulder pads! I made some, tried them but I’m not sure they’re right for me or the dress.
This is a special make for the Vintage Pledge, my first completed Special Couturier pattern. And it won me the Showstopper Prize for Vintage Pledge 2017!
#vintagepledge #vogue273
-
Spore prints

We had a couple of hours at the Auckland Domain yesterday, it’s peek fungi (is that a thing? It is now…) everywhere we go it’s easy to spot.

It looks like a regular tree filled park….but underfoot it’s a wild and exciting world, fungi are busy composting and fruiting away.

I have been reading up on fungi, this book from the library, Fungi, by Roy Watling is a good resource, with clear explanations of how how fungi works/lives, and it’s essential role in our environment, as well as useful tips and suggestions on collecting, studying and learning about fungi around us. It explains how to make spore prints from fungi:

We gave it a go yesterday. It’s very simple, we used a plastic container we had our lunch in, and carefully collected a number of small specimens from underneath four trees in the park, taking care not to over handle the ‘shrooms, Luna and I dug some up with their stems and some roots intact.

A bit of a jumble on paper at home…but they were ok!

How beautiful are these two?

Once you have the specimens home, carefully trim or twist the stems off the caps, and place them gills (on the underside of the caps) down on some paper. We used cartridge paper from a sketch pad.

The ink caps (top in the photo above) were already releasing some spores, and were ‘inky’ as their name suggests.

The guidelines for making the spore prints say to leave the caps with a cover to rest for 12 hours, we used a plastic takeaway container with a lid, and left it over night, so a few hours longer than recommended. It was very exciting for Luna to carefully remove the caps with her tweezers this morning to reveal the prints!

So beautiful!

Looking through the paper from underneath (light above):

One species made white prints, the ink caps made wet and inky prints (I think they could do with less time to produce a finer print) and two others made brown-orange prints.

It has been interesting to see how more easily Luna (and I) can identify the different species, it’s really through careful handling and close up study and dissection that knowledge is growing. We are planning to make spore prints from fungi in other parks we visit.
Some things to keep in mind:
Safety – we can identify some of the more poisonous varieties now, but to start with we would not touch an unknown fungi with our hands, use sticks, trowels gloves when handling.
Collecting additional data – some fungi are intimately associated with certain trees, so make a note, or pick a leaf from a tree you are collecting fungi from under. This may help identify the fungi and add to understanding the ecology of the area.
Happy fungi hunting!
-
Vintage Suit Sew Along…construction of my toile

Happily this week, I’ve been able to get on to some toile construction for the Vintage Suit Sew Along! Our household had a dose of the ‘flu which put a stop to many plans….so it’s quite exciting to get back on track. I had all my jacket pieces cut out and ready to assemble a couple of weeks ago, at the weekend I had time to have a good read over the instructions and put the jacket (mostly) together….

I laid the pieces out, to get my head around how the panels go together, these are the front sides of the jacket, the centre front panels also create the rolled collar.

All good so far..just some careful maneuvering around this piece, corner to nearly straight edge.

Onto the back, again laying out the pieces to check how it goes together (and avoid accidentally sewing to lefts or two rights…)

All looking good….

This all came together easily too. Exciting.

The front jacket panels have extensions, which form the under collar, so the next step is stitching the shoulder seems, clipping the corners and closing the seam across the back neck.

I was glad to practice this on the toile…. and I have to say, it works really well! I am yet to sew the facings to the front of the jacket, which finished that beautiful collar, and I’ll be confident of the fit.

But this is how it looks so far, I have to say, it looks really lovely and it’s looking like there are no fitting adjustments to make! I’ll be adding a drafted cuff, so I’ll get on the that this week and complete the facing-collar just to be sure.
In other news, last time I blogged about my suit project, I was undecided about my lining fabric, and was considering having to shop for something…Which is not really in line with my stash busting goals. Anyway, I was having a clear out of my sewing stash and came across this fabric, it’s a black and white crazy spotted cotton, it’s teamed up with the houndstooth here:

Initially, my plan was to use some colour on the inside and colour in detailing around the collar etc…well, when I found this, it just felt perfect! There is enough for the jacket, skirt and three quarter line the pants if I’m careful. So, I’m thinking I’ll go all black and white, trims too….unless I have another discovery in the stash!
How is your Vintage Suit Sew Along Going?
#vintagesuitsewalong
-
The Vintage Suit Sew Along….my plans!
So, I hope you’ve been enjoying planning your Vintage Suit project. I’ve been playing with a few different ideas, and have settled on what I think I’d love to wear, and I think I can make!
These images are all available on our group’s Pinterest Board and incorporate features and the silhouette I’m wanting to achieve with my suit.

I love this jacket, and I love how she accessorises with the scarf.

I love the shape created by the pleats in this skirt.
Another lovely shaped skirt.

Loving these cuffs!
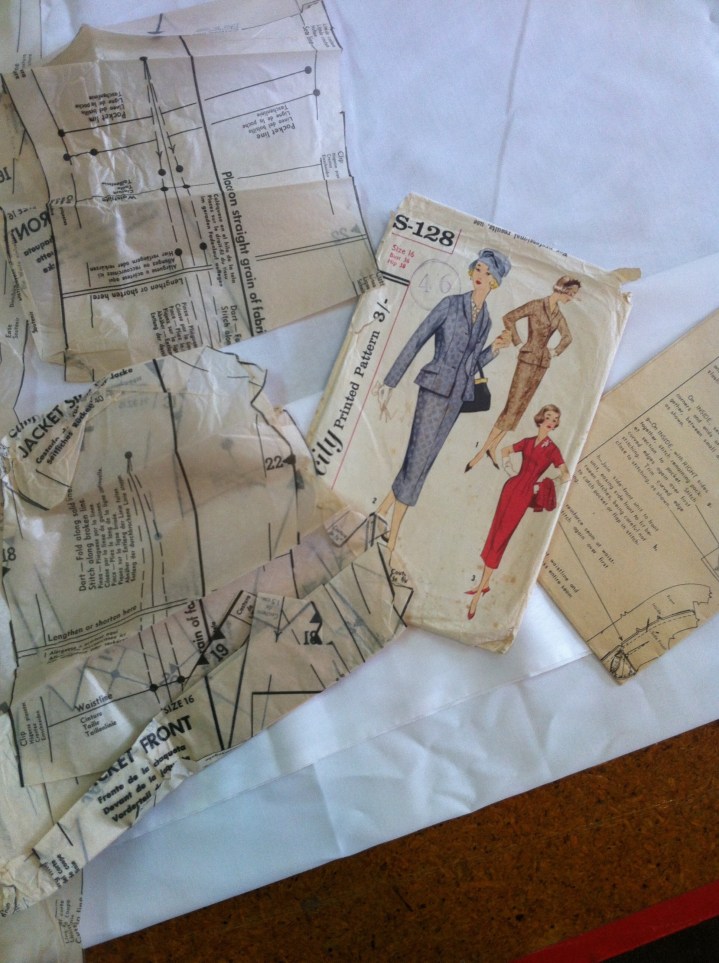
How I’ll do it – I have these two patterns and I think I can use them to create a suit, based on the ideas above.

I’m going to use this really lovely fine hounds tooth cotton a friend gave me, I have not found a lining yet….but I’ll be sorting it out in time for next month.
My plan is to make both the skirt and a pair of pants, as there is plenty of fabric, if I’m careful, and, well, I can’t decide between a skirt OR pants! I’ll be using this tried and tested 40s slacks pattern which I know and love:

As the hounds tooth is a cotton, it should work well with my climate, we just don’t get the really cold weather that might justify a delicious wool suit, at least not for long enough in midwinter (seriously, about 2 weeks are really really cold…) And I’d like to be able to wear this autumn – winter – spring, teaming it up with a turtleneck or blouse. I’m also thinking about how I can use colour to break up the pattern and add interest. I’d like to co-ordinate this with the lining, my colours are usually reds, greens, blues, so I’ll see how that goes too, and where to add the trims and details? I’ll be looking at that when I have a toile and the lining…

I have cut out my toile for the jacket, using some cheap and cheerful poly-cotton I don’t want to wear…I took out the pattern only to notice – GASP – that the front bodice lining piece has been
hacked upcut and the remaining pattern piece is missing – one of the perils of working with vintage patterns….I’ll be able to work with it though, so it’s just slightly annoying (she says now before actually re-drafting the piece…).
All carefully marked and ready to go…. exciting!
How are you all going with your Vintage Suit Sew Along plans? You can catch up on the action –> Vintage Suit Sew Along.
artist, writer, curator, mentor
